I couldn’t take it anymore.
After spending hours online looking at different templates, signing up for free accounts with different software providers, and seeing what I could cobble together with a word processor, I finally had it.
I was just going to have to build my own.
Online SOAP notes, that is.
Wait, what? SOAP notes?
Yeah, I know. Of all the things in the world to not get excited about, SOAP notes are probably at the top of the list.
But here’s the thing: if you’re a healthcare practitioner like me, you use these things ALL the time. Every day, for every patient.
And if your process isn’t rock solid, efficient, and economical, it’ll eat you alive. You'll see wasted time, wasted money, and lots of frustration if the system you’re using doesn’t really fit you.
I think that’s what bothered me the most.
I was paying, at one point, hundreds of dollars a month for a system that didn’t do things the way I really wanted them done. It would offer me all the bells and whistles, but it was like the jack-of-all-trades, master-of-none.
What’s worse, if you’re using a system from an online service provider, you better make sure you have a way OUT.
If you ever want to leave the service you’re using, they usually don’t make it easy, and it can sometimes cost you hundreds or even thousands of dollars to convert your notes to a new system.
Enough of that. I wanted to OWN my notes. I don’t want to have to pay to make my own patient notes available to me, or anyone else.
So, I used cheap, freely available tools to build my own. Exactly as I wanted them. Exactly as my patient exam and treatment process flows. (And later, I added a complete online intake system to the mix.)
Just want to skip the work?
I totally understand. Let me give you access to a library of pre-built SOAP notes forms made for Google and G Suite. All you have to do is select the one you want, load it into your account, and get going
There are templates pre-made for massage therapists, physical therapists, mental health professionals, and chiropractors!
We keep your account 100% private at all times.
It may sound excessive, but once I dug into it, you know what I found out?
It’s really not that hard.
The good news is, you don’t have to go through the trouble I did. I’m going to show you how to create and store your SOAP notes online for any kind of patient treatment. Easily. Clearly. Securely.
It doesn’t matter what kind of practitioner you are - massage therapist, physical therapist, mental health practitioner, chiropractor, MD, nurse - it can be done.
And the beauty of it?
You get to work the way you want to work.

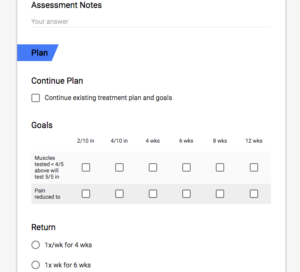
-- The basic SOAP notes I use --
You don’t have to follow someone else’s template, or fill in the lines the way some software company thinks you should.
On top of that, you get to ditch all the paper. With traditional patient notes, even if you’re just seeing a handful of patients a day, the paper can pile up. Fast.
Want to see the possibilities?
Take a look at our form examples page to see some possibilities of what you can do with Google forms.
You have to file it, you have to make sure it’s organized, you have to make sure it’s secure. And if even one other person needs to access your files for any reason (an assistant, associate, or some other staff member), you have to make sure they’re handling the notes just as carefully as you are.
Otherwise, they get mishandled, or misfiled. And we all know that a misfiled set of patient notes can be as good as lost, right?
How nice would it be to be able to pull up your notes almost instantaneously? How nice would it be to never had to spend time searching through piles of notes again? How nice would it be to be able to provide your notes to a third party with a few clicks? How nice would be to have an online note-taking process that’s laid out exactly the way you like to work?
All of these things are possible when you put your notes online in a safe and secure manner.
So let’s dive in….
Why put your SOAP notes online?
This should already be crystallizing in your mind by now, but let’s review the benefits of this process:
1. Work the way you want to work.
Not the way some software company wants you to, not from someone else’s template. YOUR way.
2. Own your own data.
The problem with signing up with an online SOAP note or EMR software company comes when you want to leave. I’ve run into very few companies that make this process easy, and in some cases it can cost you thousands of dollars just to get your data converted out of one company’s format, and into the format preferred by the next one. What a pain!
When you own your own data, you don’t have this problem. It’s yours to do with as you please.
3. They’re cheap!
How does free sound? You can get the basics going today simply by having a Google account.
Not good enough? How about beefed up security, HIPAA compliance, a ton of extra storage, secure email, and the ability to use a personalized business domain name? You can get all of that for $6 a month. That’s not a typo. Six dollars.
The myth floating around out there is that a software program has to cost a lot of money in order to get the job done and be secure. Not true.
4. It’s easy to backup your data.
People worry about losing data if they put everything in digital form. You solve this problem with simple, and regular backups. It’s literally as easy as dragging a folder from one window on your computer to another. Rather have it automated? Pay $4 a month for a good backup service and you’re done. I’ll show you how.
Okay, we’ve covered the Why? What about the How?
Step One: Setup Your Account
The first thing you need is a Google account. If you have a GMail account, you already have one. Otherwise, head over to https://accounts.google.com and click on the “Create account” link.
A free Google account gives you access to everything you need to create and use Google Forms, which is the program we’ll use to create our online SOAP notes. The big caveat? It’s not fully HIPAA compliant. In particular, Google won’t sign a Business Associate Agreement unless you have a paid G Suite account.
The good news? As mentioned above, they’re cheap! $6 a month gets you the starting G Suite account, which for most people will be more than plenty for their purposes.
If you know you want a G Suite account, go to https://gsuite.google.com and follow the prompts to get it setup. Be sure to follow their recommendations on how to make sure your account is HIPAA compliant here.
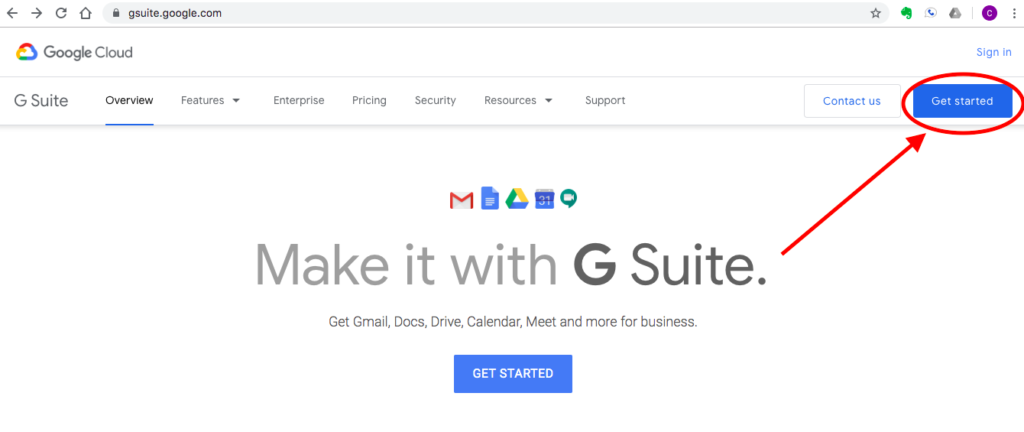
— Signup for G Suite for HIPAA-compliant security, or just use a plain Google account. —
Step Two: Create Your Form
Okay, got the account setup? Great. Now, let’s create a basic form to enter our notes.
Make sure you’re logged into your Google (or new G Suite) account, and go to https://drive.google.com.
Click the “New” or “+” sign, select “More”, and click on “Google Forms”. This will pop up a fresh Google Form template.
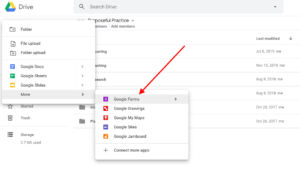
— Get started with a new Google form. —
From here, use the interface to create the kind of form you want to use. Basic S-O-A-P sections? No problem. Click the “+” sign to the right of the form, and add whatever kind of question you’d like.
“Short answer” gives you one line to write on. “Paragraph” gives you as much room as you want. There are also options for multiple choice questions (e.g. is the patient male or female?), checkboxes (which treatments did you perform?), linear scales (what’s your pain level today?), and many more.
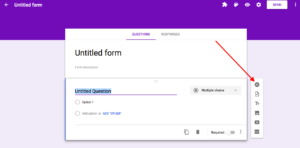
— Click the plus sign to add a new form field. —
You can drag questions around to move them up or down your form, and change the color and font of the form with the “customize theme” button at the top.
Want to preview how it’ll look when it’s “live”? Just hit the eyeball icon at the top, and it will pop open a new window with the live form.
Now, keep in mind, if you’re using a free Google account (i.e. you don’t have a G Suite account), the ability to submit data to the form is open to the public. But that’s true ONLY if you’ve given the link to someone else. Viewing the data is only visible by you. As long as you never give out a link to the form, this shouldn’t be a problem.
(If that still bugs you, check out this great video on how to easily protect your form with a password so that only you can use it.)
If you want beefed-up, HIPAA-compliant security (which I recommend), you need to use a G Suite account. Assuming you’ve set it up correctly, the form should only be accessible by you, when you’re logged into your account. Want to double check? Just click on the settings (the big gear) icon at the top. It should tell you that usage is restricted to people logged into your G Suite domain.
Step Three: Enter Some Notes!
Got things about how you want them? Let’s enter some data to play with.
Click the preview icon at the top. Now work through your form the same way you would if you were working with a patient. When you’re done, just hit the “Submit” button.
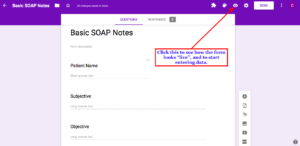
— Click the “eyeball” icon to start entering data. —
Once you do, you should see a page with a link to submit a new response.
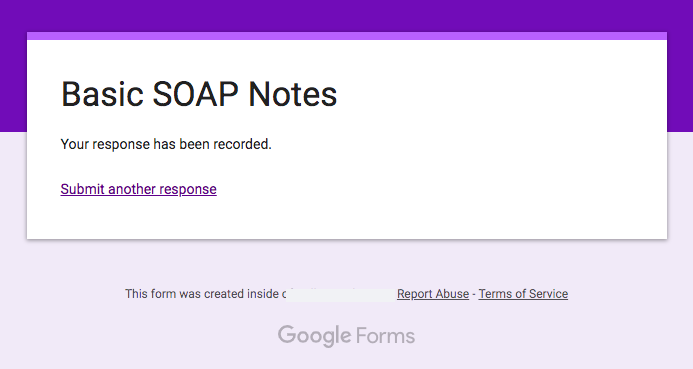 — This is the screen you’ll see after you submit your form. —
Click that link and work through your form a couple more times so that you have some responses to work with. You’ll quickly see how easy it is to enter new notes, and it should become pretty obvious if there’s something about the form that isn’t working well.
If so, just open up the form again and edit it until it’s exactly the way you want it. Problem solved.
Step Four: Review Your Notes
Ok. You’ve got your form created, and you now have some notes entered that you’d like to be able to review (just like you might before any patient visit).
You’ve got a few options here, so be sure to play around until you find the method that works best for you.
First, you can pull up the data from the same place you’ve been editing the form.
Take note, this is not the link TO the form where we SUBMIT data. We want the page where you can actually edit the form itself, which you can get to by clicking on the name of the form in Google Drive.
Once you open it, at the top of that screen, you should see that there’s now a number next to the RESPONSES option at the top of the form, like this:
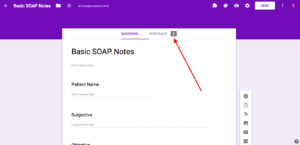
— Click the “Responses” link to see your form submissions. —
If you click on the word “RESPONSES” at the top of the form, you’ll be able to easily review any data that’s been entered. It shows you the number of responses your form has received, and it gives you the ability to view the data in aggregate (click on “SUMMARY”), or one entry at a time (click on “INDIVIDUAL”).
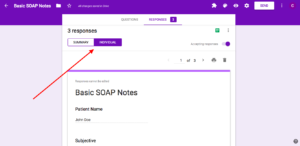
— Click on “individual” to see responses from each time you filled out the form. —
After you click on the “INDIVIDUAL” button, you should be able to scroll through each response by clicking on the arrows to quickly get to any information you’ve entered, in chronological order.
But what if you don’t like reviewing the data like that? No problem, you’ve got options.
The second way to look at your entries (for you I-love-the-raw-data people out there) is in spreadsheet format.
To view it this way, on the RESPONSES screen of your form, click on the green Google Sheets spreadsheet icon at the top. This will create a linked spreadsheet with all of your response data.
![]()
— Click the green Google Sheets icon to see the raw data —
Feel free to make minor tweaks to the format, like centering columns, spreading them out, or bolding certain areas, as I’ve done below. As long as the basic layout of the data doesn’t change, you can make it as readable as you want.
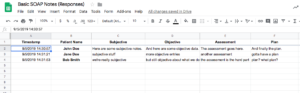
— One option: view your form entries in spreadsheet format. —
But what if you want something more traditional? Another option is to be able to view and save your notes in PDF format.
To do this, pull up one of your notes from the review screen, and click the print icon at the top. Once there, under the “Destination” option, choose “Save as PDF”.
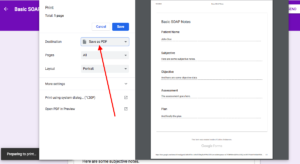
— Save your notes in PDF format. —
If you do this and click “Save”, you should get the option to save the PDF wherever you like. If you have Google’s Drive File Stream installed, you’ll be able to save the PDF right back to any folder you like within your Google account. That way, all your patient data is stored securely in your Google account for easy retrieval and searching.
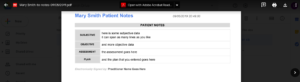
If you pull it up with an easy search and click in Google Drive, it’ll look something like this…
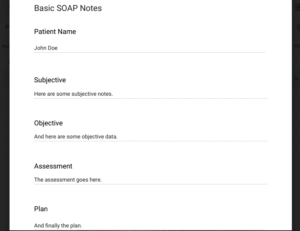
Finally, for those of you willing to put in a little extra effort, you can have a PDF created automatically, in whatever layout you want, by setting up a program called Form Publisher.
This way, you just fill out your form, hit submit, and voilà!, instant PDF, stored wherever you want, for easy storage and reference. The beauty of Form Publisher is in the ability to have the notes look however you’d like. The way you submit the data using a Google form, and the way the information is stored and displayed, can be completely different.
For a basic example, check this out:
 — An example of an automatic PDF created by Form Publisher. This can be as simple or as fancy as you’d like. —
Alright. We’ve got our account, created our form, submitted new patient notes, and saved them in our favorite format. What’s next?
Step Five: Send Them Off!
Every practitioner has to be able to share patient notes with somebody.
Whether it’s the patient, a third party payer, or another healthcare practitioner, you want to make the process of finding your notes and sending them off as easy as can be.
If your notes are already in PDF format, your job is basically done. You just select the ones you want, and choose how you want to send them. You can print them off for physical delivery, or attach the PDFs for uploading or emailing (be sure you have permission, and the way you’re going to send them is legal and secure!).
If they’re not already in this format, you can just follow the same instructions above to print off any notes required. You’re done with the days of hunting through piles of paper and other patient files to find what you need.
Step Six: Cover Your Bases
It’s a practitioner’s worst nightmare to lose all their patient notes. Don’t be the one to have that experience.
People with paper notes think they’re immune from these worries. They’re not. From misplacing notes to building fires, your precious patient data can be gone in a heartbeat.
To make sure you’re secure, practice making a regular copy of your data to guard against the most common cause of data loss: user error.
In other words, you accidentally delete it!
Think it’s not possible? You’d be surprised. Sometimes all it takes is accidentally dropping something on your keyboard to hit the wrong key combination and POOF! your entire patient folder is gone.
Don’t be that guy.
Easiest way to prevent this kind of error? Just make a simple copy of the data with a few clicks:
- Right click on the folder where your patient data resides. (If all your data is in one form, right click on the form itself.)
- Click on “Download”.
- On the next screen, choose a secure location to download your data, or, using Drive File Stream, save it right back to your Google account, in a different location. (The most important thing is simply having a copy that you’re not likely to accidentally delete.)
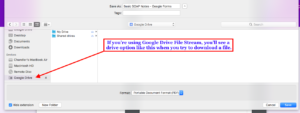
— Save files easily to Google Drive using Drive File Stream. —
You’re done!
Now, if you don’t like the idea of having all your data on Google’s servers, you can always employ another, HIPAA compliant cloud storage provider to store your data. Dropbox, Box, and Microsoft OneDrive are all options. Just keep in mind that having a cloud storage provider that advertises themselves as HIPAA compliant does not, of itself, make your practice HIPAA compliant. (That’s a bigger topic than this post, but this gives you the tools to get started.)
If you have a G Suite account, you can also pay as little as $4 a month for a professional backup service like Spanning. Unless you have a ton of other data and a large filesystem structure that you keep on Google Drive, it’s probably not necessary as long as you’re disciplined enough to handle the regular backups yourself.
One Last Thing…
So how’d it go? I’d love to hear about your experience setting up a system like this, and any challenges you face. Let me know in the comments below!
Just want to skip the work?
I totally understand. Let me give you access to a library of pre-built SOAP notes forms made for Google and G Suite. All you have to do is select the one you want, load it into your account, and get going
There are templates pre-made for massage therapists, physical therapists, mental health professionals, and chiropractors!
We keep your account 100% private at all times.
Loved your tutorial. How do you sign SOAP notes on a Google Form?
Hey there Joelle. With a G Suite account notes are “signed” in the same way they would be if you were signed into an all-in-one EMR system. That is, your login authenticates that you are the one accessing the account, and the G Suite system has a detailed auditing and security system to verify that it is you who are editing the document. I always recommend following Google’s HIPAA compliance protocols (including two-factor authentication) to make sure that you are the only one accessing your data, and thus are the only one who can edit the notes. Hope that makes sense!
I would love to use forms for compliance auditing on a Pharmacy. For example, we have to take the temp and humidity of our pharmacy daily. Can you make it so the forms are time stamped and cannot be modified after data is input? Thus meeting our board’s requirements?
Also, thanks for your site. G suite, forms sites, etc is one of the best ways small businesses should be managing their workflow! I appreciate you giving all of us insight and helping us grow our businesses.
Hi Chris,
Forms are automatically time stamped upon submittal simply by you being logged into a G Suite account, with which automatic user-level auditing is included. If you have your form input converted into a PDF using a tool like Form Publisher, you also have a way of storing your input in an uneditable format.
Thanks for sharing! How do you access the form for each patient? Can it live in your Gsuite drive in the fillable survey format or do we need to store the forms link somewhere to click to fill out the form for each patient?
I find it easiest to use the same form for every patient, and simply add a new patient’s name to the form the first time they come to your office. You only have to do it once, and then you just select the patient’s name from a dropdown list for subsequent visits. To fill out the form, just save the fillable form link as a bookmark, or put the link on an internal webpage (kind of like a dashboard for your practice). Then just click on it anytime you need to fill out notes.
Incidentally, I actually have the patient’s name added automatically to my forms using a script as soon as the patient fills out my intake form. It’s a little more advanced work to set this up, though doesn’t take a lot of effort once you know what you’re doing. I may post that information to my email list for those who are interested.
Hope that helps!
is there any way to co-sign a note through google forms?
Hi Jordan,
Do you mean have multiple people sign the same note, as is the same way you might co-sign a loan? This really depends on what kind of signature you’re looking for. I discuss a lot of those issues in the sidebar of my article on intake forms.
It also depends on whether you’re talking about signing an intake form, or signing your SOAP notes. For the purposes of SOAP notes, these forms are “signed”, in part, based upon your authentication with Google’s servers. For that reason, I’m not aware of a way to have multiple people simultaneously sign a single note. You could, however, certainly have multiple practitioners add individually signed notes to a single patient’s record.
For intake forms, it would theoretically be possible to add multiple input fields in a form to allow more than one person to indicate their acceptance of whatever is in your form. You run into the same authentication issues that are outlined in the link I included above.
If this doesn’t answer your question, hit me up with some more specifics and I’ll see what I can do. :)
This is so helpful. If I have completed a note in Google Forms and published it into PDF, is it possible to create an addendum at a later time to that note? Any suggestions? How would you do that and show a time stamp in a way for that revised PDF or form?
I actually have an additional form that I just call an Addendum Form. In it, I designate which note I am modifying and I’m able to add whatever information was missing from the original. It could be as simple as a paragraph text field where you are able to describe any additions or modifications to your original note.
Upon submission, a new timestamp is created with a new PDF that is also designated as a note addendum. This leaves the original note unmodified (as it should be), and adds the new addendum to the patient record.
Hope that makes sense!