When you’re drowning in the complex, you just want something that’s simple.
Getting a practice going can feel that way. There are so many little details you have to pay attention to, it would be nice if you could have just one aspect of your professional life that would run on autopilot.
Let's take care of one of these things right now.
Once you get one of these down, adding more feels easier and easier. Before long, you’re no longer drowning. You’re floating on your back in the water, enjoying the sunshine.
Sounds nice, right?
And by the way - while I’m still talking about drowning, it’s not the water I worry about, but the paper.
I’m going to show you how to put your intake forms online.
Don't Take My Word For It
Check out our example forms page for just a few of the possibilities you have to create the ideal process for your practice.
Just like getting your SOAP notes online, it’ll be cheap, easy, and secure. It does require some up-front work, but once it’s done, it’s done. And unless you decide to change the content of your intake form, you won’t have to deal with it again.
It’ll just run itself, churning out the forms you need. Every time, in the right format, in the right place. No paper, no filing, no worries.
Let’s get to it.
How about we just do the work for you?
Don't have the time to custom build a form? I've got you covered. Let me give you access to a library of pre-built Intake Forms made for Google and G Suite. All you have to do is select the one you want, load it into your account, and get going.
There are templates pre-made for massage therapists, physical therapists, mental health professionals, and chiropractors!
We keep your account 100% private at all times.
A Quick Review
We covered a lot of the details about the tools we’ll use to get forms online in my article on putting your SOAP notes online. Check it out.
In particular, Steps 1 through 4 of that article teach you how to…
- Setup an inexpensive G Suite account
- Learn the basics of how to create a Google form
- Enter information into the form, and review the data once it’s been submitted
- Share the form data with other (trusted) people, and get the information backed up
So, if you’re not familiar with how to do those things, review that article so you can get up to speed.
There are a few ways that putting an intake form online is different from SOAP notes, however.
For one thing, while a form for SOAP notes might have as little as 3 or 4 fields to enter information, an intake form can be extensive. As in pages-and-pages extensive. And that’s ok.
It all depends on the kind of practice you’re running, and how much information you want to capture at the start. It might take a little work to get the form setup, but once it’s done you’ll be good to go.
There’s also the issue of waivers and consent forms. You know, all the legal, procedural, and privacy information we need our patients and clients to sign off on.
If we truly want to go paperless, we’ve got to handle all of this.
Let’s Flip This Around
In a traditional brick-and-mortar office, using paper forms, the patient typically fills out the parts about their addresses, phone numbers, patient history, and current complaint first. For simplicity, I’ll just call this stuff “the questions”.
After that, they’re hit with all the waivers and consent forms. You know… privacy policies, cancellation policies, informed consent, HIPAA waivers, etc. I’m going to call all of those things “the waivers.”
With our online system, we’re going to reverse that. Waivers first, questions second.
Why? Because this is all happening online, and we’re getting ready to collect Protected Health Information (PHI). So before we have our patient start divulging their life history, we’re first going to have them acknowledge the inherent risks (and conveniences) involved in communicating with us electronically.
| Hey, read this! This may come as a shock, but it’s important for you to remember one thing: I’m not a lawyer! More importantly, you, and only you, are responsible for the decisions you make about your practice, and the risks you take with your patients’ information. So, please, consult a lawyer about your practice, and about any security or privacy concerns regarding your patients’ data before you follow these instructions. |
Where do you do that? Up front, right when they pull up the form. Here’s what you tell them:
- Let them know that the email address they submit will be used to send them a copy of their responses. If they did not submit these responses themselves, they should notify your office immediately, as it would mean someone else was attempting to submit information without their permission.
- If they don’t want to submit a form electronically, or they don’t agree to typing their name and clicking on “submit” as their electronic signature, they should stop now and fill out your paper forms.
With these two things, we establish their intent to sign, and we make sure and create a link between the person filling out the form, and the validity of the data they submit. Much more on the signature issue is below.
We’ve also given them an opt-out option by giving them a link to paper forms, which is critical from a legal standpoint. That said, in my experience, very, very few people will choose the paper option.
BIG BLUE SIDEBAR ON ELECTRONIC SIGNATURES Ok, for those of you that want to get into the weeds on this whole electronic signature thing, here are the details. At the most basic level, there are two areas we need to make sure are covered. One is the person’s intent to sign, and the other is a way to tie the document we’re having them sign to the actual person who’s signing it. With a clear explanation ahead of time, we get the user to acknowledge that by clicking the submit button and typing their name, they are establishing an intent to sign. By only sending a link to the form to someone who we’ve already made contact with, and by sending a copy of the forms to that same address – with their explicit agreement and acknowledgment of the risks – we tie the responses to a particular person. Are there other ways to handle the signature issue? Certainly. Depending on the laws where you live, and your level of comfort, you might want something more robust from a security standpoint. The dicey part is that when we start talking about putting any kind of PHI online, we can get into a lot of confusing legal issues. And if you start searching around online about what passes for an electronic signature, you’ll be inundated with fear-mongering articles and advertisements about how you’ll be strung up in the town square if you so much as breathe sideways on a HIPAA privacy law. Who’s out there telling you that you MUST have the most secure system available? The people SELLING the systems, of course! If you want to jump into the weeds around all the legalese before you’ll be comfortable, here are a few places to start looking:
For this reason, I highly recommend a waiver dedicated to your patient/client accepting the use of what are now, very common, electronic communication methods, because the use of these methods is so common. This includes email, text messages, and fax transmissions. There’s a great discussion of the issues around communicating with your patients electronically here. In addition:
Ok, so if HIPAA didn’t set an electronic signature standard, what law(s), in particular, should be consulted? In the US, all states (except New York, Washington State, and Illinois) have adopted the Uniform Electronic Transactions Act (UETA), which defines an electronic signature like this:
Furthermore, the official text of the act includes this comment, supporting our “click to submit” process as a valid electronic signature:
Keep in mind that an electronic signature is not the same thing as a digital signature. The latter involves using cryptography to create an electronic signature. The “click to submit”, or “click to indicate your acceptance of terms” process is one method many sites use to effect the power of a signature that does not involve any sort of cryptography. You are merely indicating understanding of the terms and your intent to sign. Still not comfortable with the “click to submit” process? You’ve got options:
|
Start Adding Your Waivers
Ok, we know what we want to say, and we know where in the process we want to say it.
Actually adding it to the form is easy. Just click on the “Form description” section at the top of your form, and add whatever explanation or initial waiver you’d like.
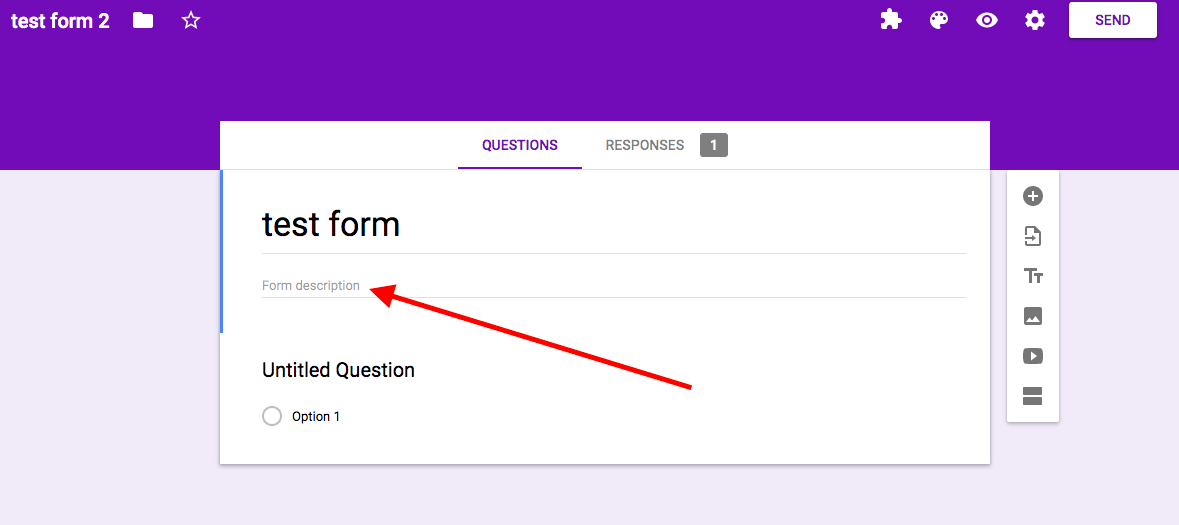
— Click on “Form description” to add lots of explanatory text to your form. —
You can add conditions to the bottom of your text by adding a “question” of the appropriate type. You might use a “checkbox” question to tell the user to “check the box here if you agree.” Or you might insert a “short answer” question to tell them to “type your name to indicate your acceptance”.
You can drop in additional waivers on subsequent “pages” of your form, which you insert by adding a new “section” to your form.
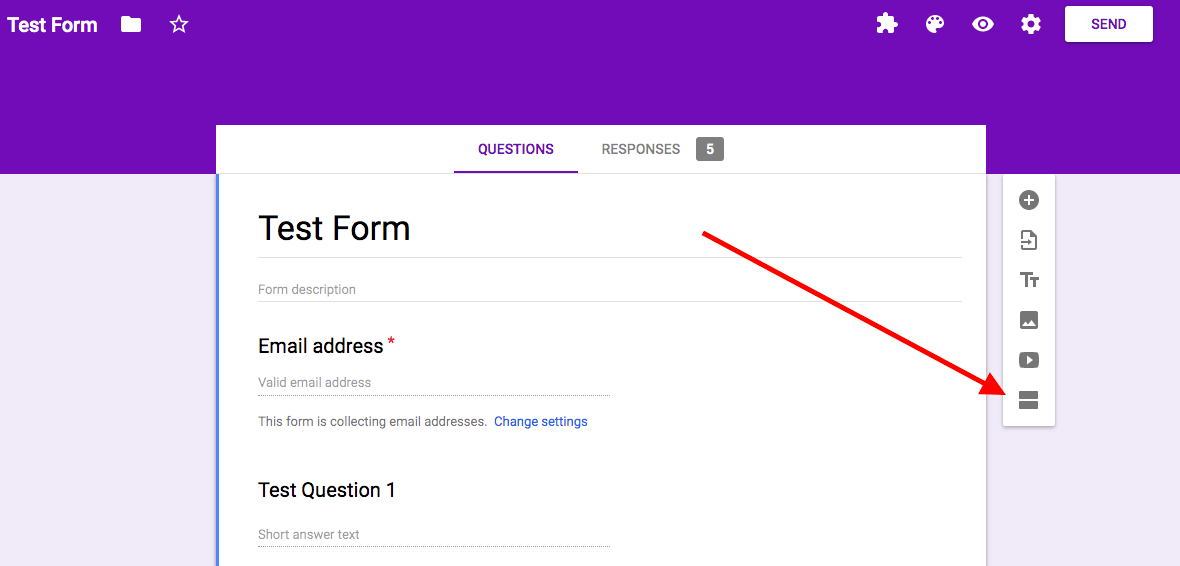
— Click on the “new section” icon to add a new “page” to your form. —
This allows you to logically break up your intake process into sections, so it’s not just one long, run-on form that might be overwhelming for the user.
You can add sections for any kind of health topic you can think of, and add questions that are in paragraph form, linear scales, checkboxes, dropdown lists, and so on. Go crazy.
Keep in mind that, at the very end of the intake form, they will need to click on the “submit” button. At this point you can clarify with additional wording that tells the user that clicking on the submit button indicates that the data is accurate and they have accepted your terms.
Fill in the Questions
This is where the lion’s share of your intake form will reside. Depending on how detailed you want to be, you might just have one section for this part of your form, or you might have ten.
Refer back to the SOAP notes article for details on choosing different question types for the various forms of information you want to collect.
Just like you did with the waivers, feel free to break up your form into different sections to make it logically flow for the user.
Once you’re done with that, it’s time that we take a look at how we store and use the data that’s collected.
Save the Data the Way You Want It
We obviously want to setup our intake forms to be as easy as possible for our patients to use and read. But that often means we need lengthy explanations and long-form terminology that YOU don’t need (and often get in the way) when you’re reviewing the data.
The cool thing about having an online intake form is that we get to separate the way we ask a patient for information from the way we save and review it.
(You know where to look for a full list of options around reviewing the responses that get submitted to your form.)
Since intake forms can sometimes be on the long side, it’s nice for me to have that information succinctly formatted so that I can review it quickly before I see the patient.
One of the most effective ways to accomplish this is by using a G Suite add-on called Form Publisher. Once setup, Form Publisher will automatically create a PDF based on a customizable template.
PDFs are easy to save, extremely fast to pull up, and almost universally readable and shareable with third parties, when necessary. Using Form Publisher, the PDF will be created in your secure G Suite account with a unique timestamp, making it a much more legally defensible document.
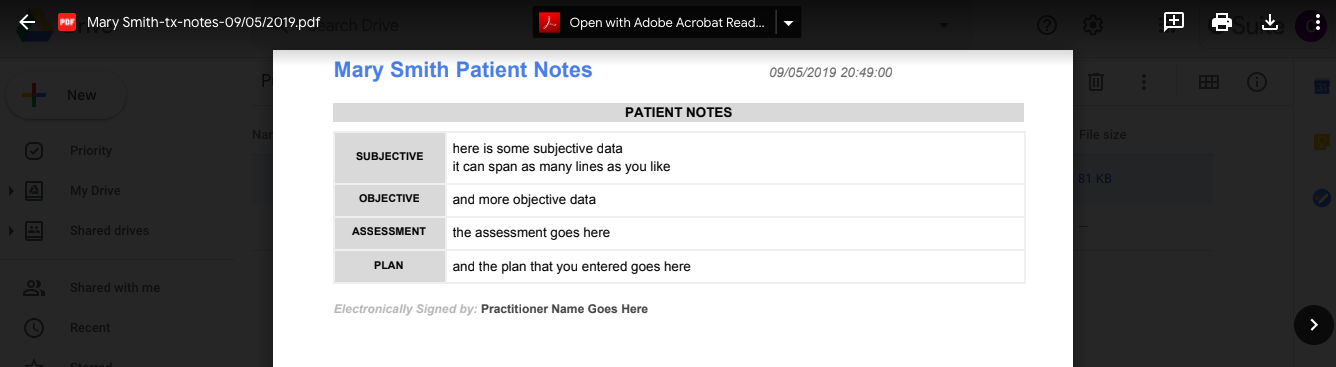
— An example of a basic Form Publisher PDF viewed through Google’s preview function. —
Setup Form Publisher
Here’s what you need to do.
While logged into your G Suite account, go to the G Suite marketplace, find Form Publisher, and get it installed.
What about Business Associate Agreements? Any HIPAA-covered entity needs to have a Business Associate Agreement (BAA) in place with a vendor or service provider that has access to your patients’ PHI. While you’ll be using the Form Publisher add-on, the company does not, as a rule, have access to your data or PHI. When might they? If you call for technical support. This is true with any company for any product or service you use in your office. If you’re using a service that handles your PHI, and you need help with it, you need to either make sure you do not expose patients’ PHI in the process of your support call, or have them sign a BAA ahead of time. In general, it’s a good idea to contact any service provider’s support staff so you can have a conversation with them about exactly what they will, and won’t, have access to regarding your patient data. |
If you’ve properly setup G Suite to be HIPAA compliant, you’ll need to “whitelist” the Form Publisher application, giving it explicit permission to operate within your private G Suite environment. Here’s what you do:
- Go to admin.google.com while logged into your G Suite account
- Click on Apps, then Marketplace Apps
- Click the settings icon (three vertical dots) in the upper right corner of the page
- Select “Manage Apps”
- Click “Manage Access to Apps”
- Make sure “Allow users to install only whitelisted applications” is selected
- Click on “manage whitelist”
- Click the “+” sign to add Form Publisher to your whitelist
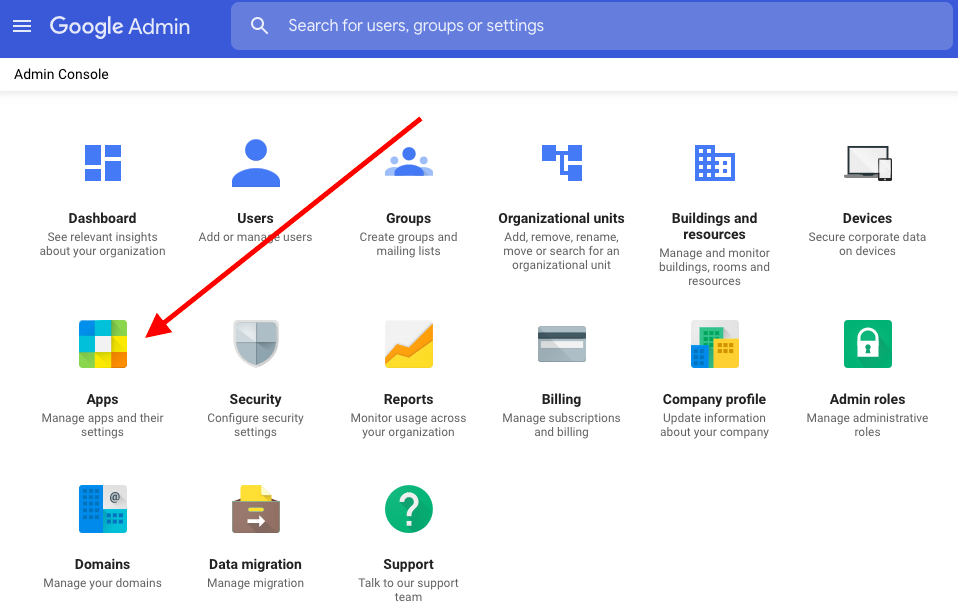
— The Apps section from the G Suite Admin Console. —
Alright, Form Publisher is installed and ready to go. Now it’s time to use it.
Open up the new intake form you’ve built in Google Forms, and click on the puzzle icon.
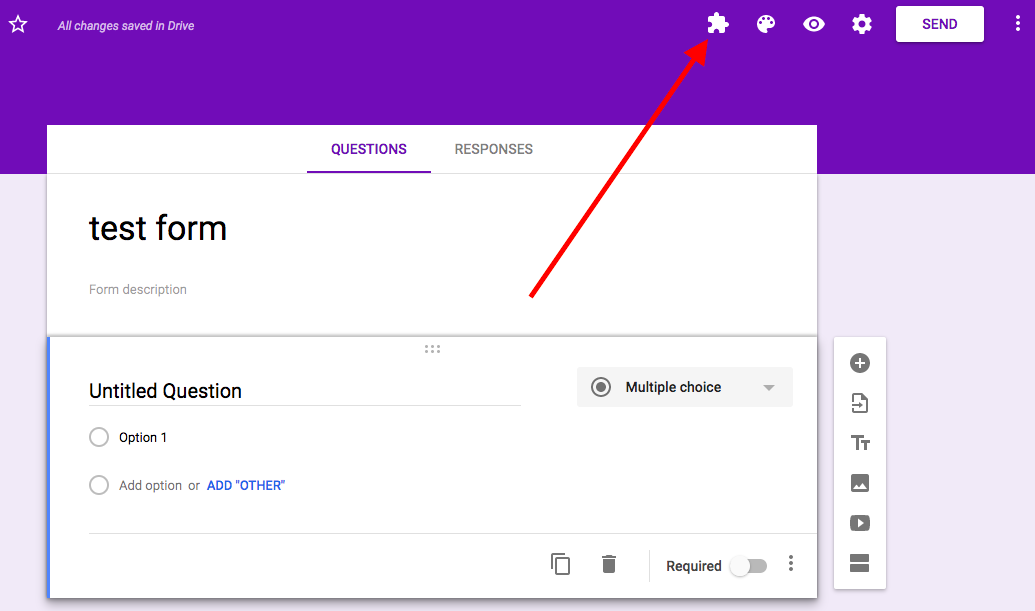
— Click the puzzle icon in your form to setup Form Publisher. —
Select Form Publisher, and follow the prompts to setup a pre-formatted template as a Google Document.
It will show you the name of your new template, which is the file that allows you to change the layout of the PDFs that get generated.
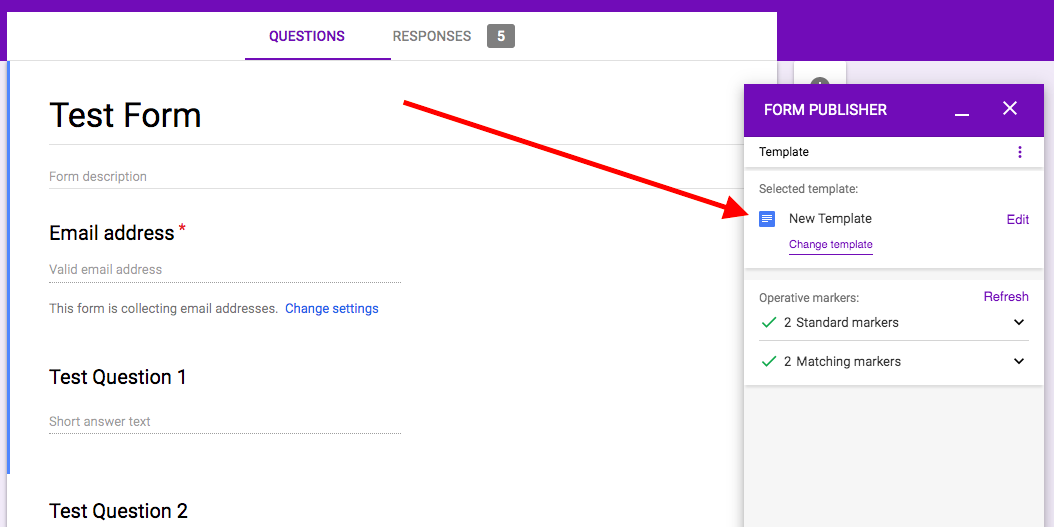
— Select which file you will use as a template for Form Publisher. —
Click “next” to then confirm options like what your newly generated files will be called, and where they’ll be stored. Notice that, for the file names, Form Publisher will use what it calls “markers”. More on these below.
Be sure to click the option to “Keep PDF copy in Drive”. This option insures that Form Publisher will generate the PDF we want.
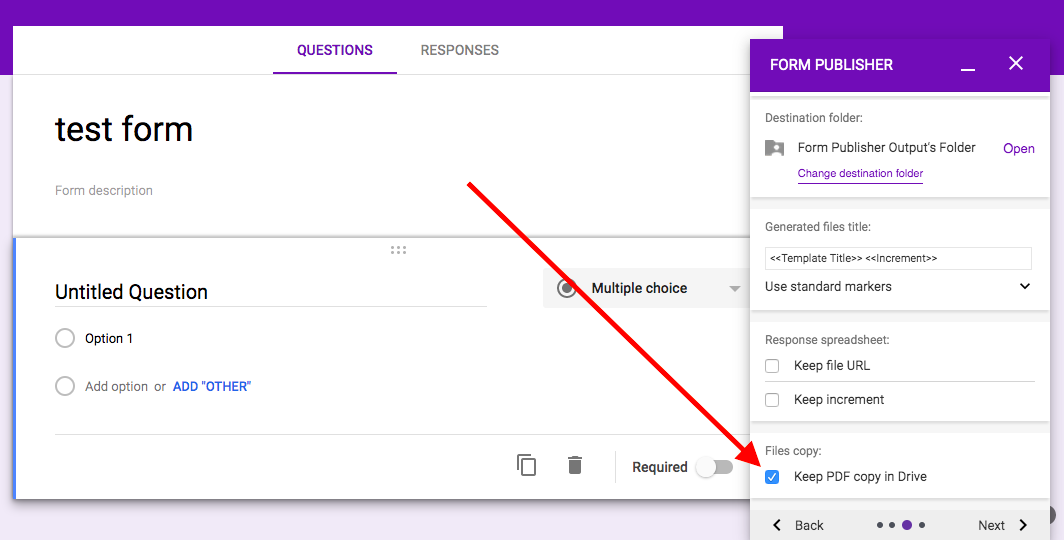
— Check the “Keep PDF copy in Drive” option to make sure that your form automatically creates a PDF. —
Click next to choose how the newly generated files will be shared, if at all. You can have them automatically sent to you, or simply leave them in the directory you specified earlier.
I generally remove any additional notifications here, since in a second we’ll set things up so that the form emails you anytime someone fills it out.
Click next, and you should be ready to go for a trial run of your PDF creation process.
Time to Test
Ready for your first test drive?
Open up your form again, and click the preview (eyeball) icon to get to the live version. Work through the whole thing like you are a new patient in your practice. When you’re done, hit the “submit” button at the bottom of your form.
Within a few seconds, you should have a PDF automatically created in the output folder you specified during the Form Publisher setup (it defaults to “Form Publisher Output’s Folder”). You might also see a Google document that got created with the same name. These are part of Form Publisher’s standard output, and can be safely deleted or ignored.
Click on your new PDF to open it up and check it out!
Customize Your PDF Output
Uh oh.
It doesn’t look the way you want, does it?
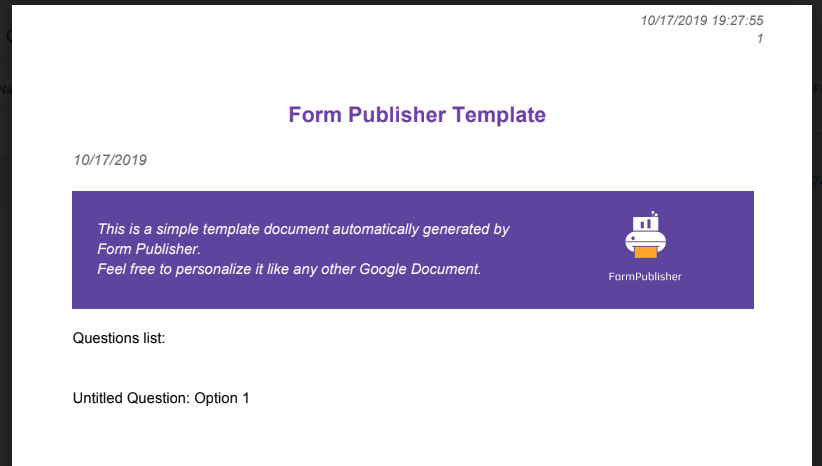
— The default Form Publisher template doesn’t usually generate things the way want them. —
It’s got a big Form Publisher purple logo right in the middle, and the layout is very basic, and not very attractive, right?
No problem. This is the beauty of Form Publisher. You can now modify the template to make it look exactly how you want it.
Open up your Form Publisher template, which is usually in the same directory as your form (the default file name is “Form Publisher Template”.
Notice all the words in the template that are in between the “<<” and “>>” symbols?
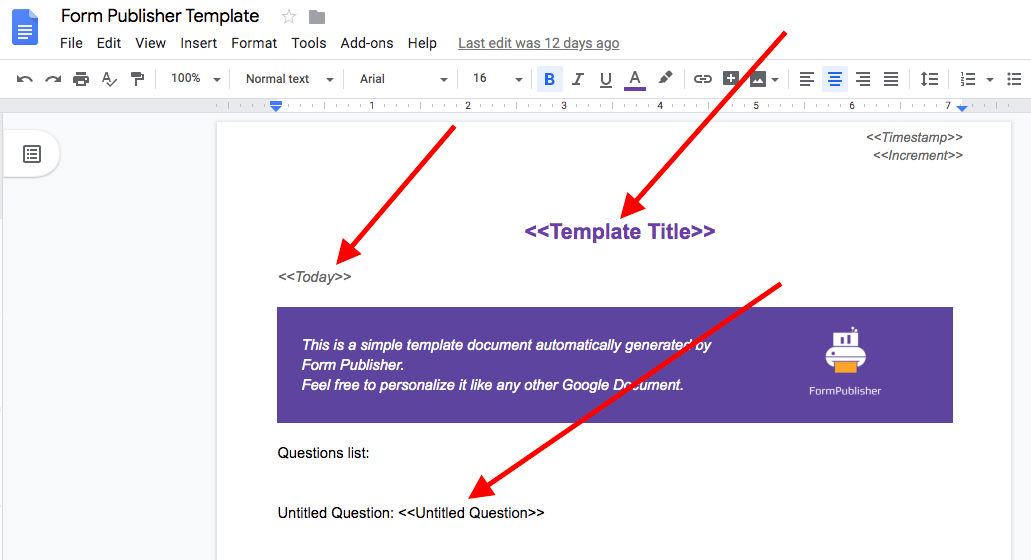
— Anything between “<<” and “>>” is what Form Publisher calls a “marker”. —
These are the placeholders for the items your patients select or enter in your form. So, if you happen to have a question in your form titled “Patient Name”, then you will see a field in your template called “<<Patient Name>>”. Form Publisher calls these “markers”.
You can use this marker anywhere in your template, multiple times, if you like, and when the PDF is generated, that marker will be filled in with whatever was entered or selected for that question.
Here’s what one part of my intake form looks like:
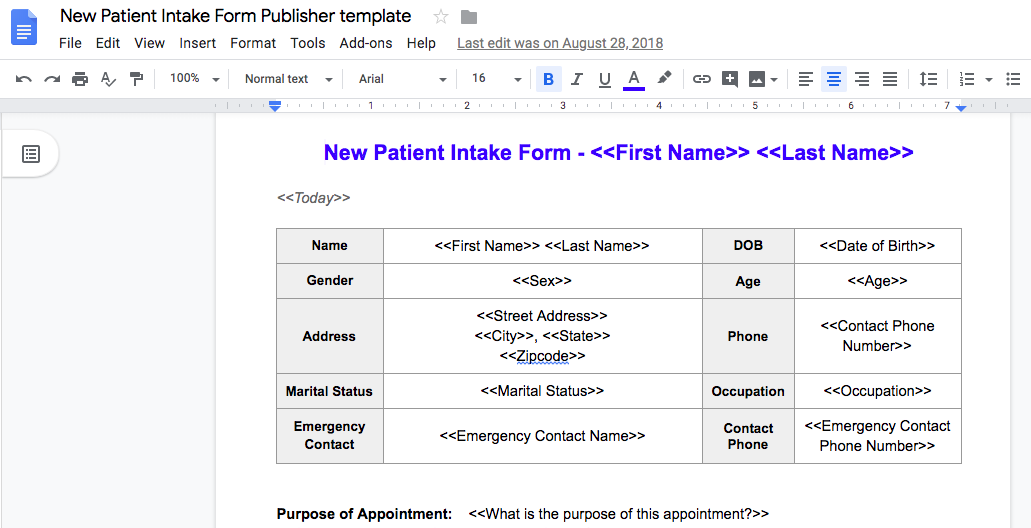
— One part of my new patient intake form template. —
Notice how I completely tossed the default Form Publisher output in favor of a clean, table based look. As long as you leave the marker for each question, you can arrange the output however you want. You can do anything and everything you might do in a regular document.
Since I’m the only one reviewing the data, I want it to be as clear and fast to get through as possible.
And incidentally, you can use these same markers anywhere in Form Publisher’s setup. For example, if you want to change the name of each PDF that gets created to make it correspond to the name of the patient that is filling out the form, you can do that.
Just go back into the Form Publisher setup (click the puzzle icon in your form), select “Destination folder and naming convention”, and then “Generated files title”. In that field, you would put <<Patient Name>>. Voila! Now every PDF that gets created will be named for the patient filling out the form. (Additionally, if you made it “<<Patient Name>>-<<Today>>”, the file name would be made up of the patient’s name, and the date they submitted the form.)
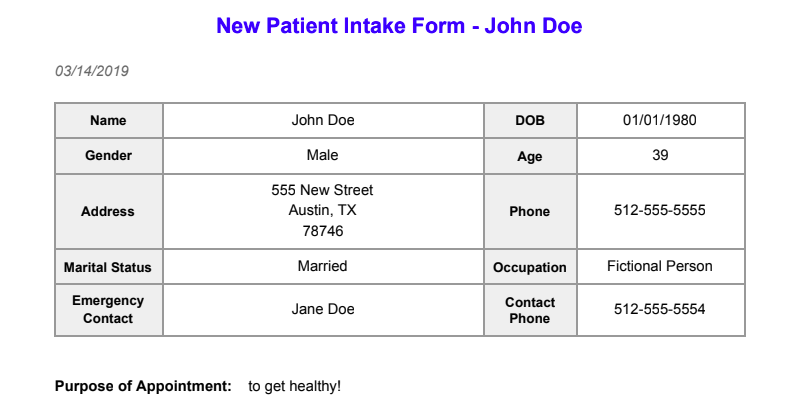
— Example output based on my intake form template. —
So, keep modifying your template, then resubmitting test data in your form to generate a new PDF until your output is exactly how you want it.
Keep in mind: just because, for example, your waivers occur at the beginning of the form that your patients fill out, does not mean it has to appear that way in the PDF that gets created.
I put all the waiver and consent form information for my practice in small print at the end of the document, where I will review it quickly before their appointment. But the data I’m really interested in is everything regarding their history and health — all the reasons they came to see me. That’s the reason they’re in my office, so that information goes front and center.
Stay In The Loop
Once you’ve stopped most of your testing and have everything looking the way you want, you’re probably going to want to get notified when someone fills out your form. That’s easy to handle.
Open up your form and click on the “Responses” link at the top. Click on the three vertical dots next to the green Google sheets icon, and make sure “Get email notifications for new responses” is checked.
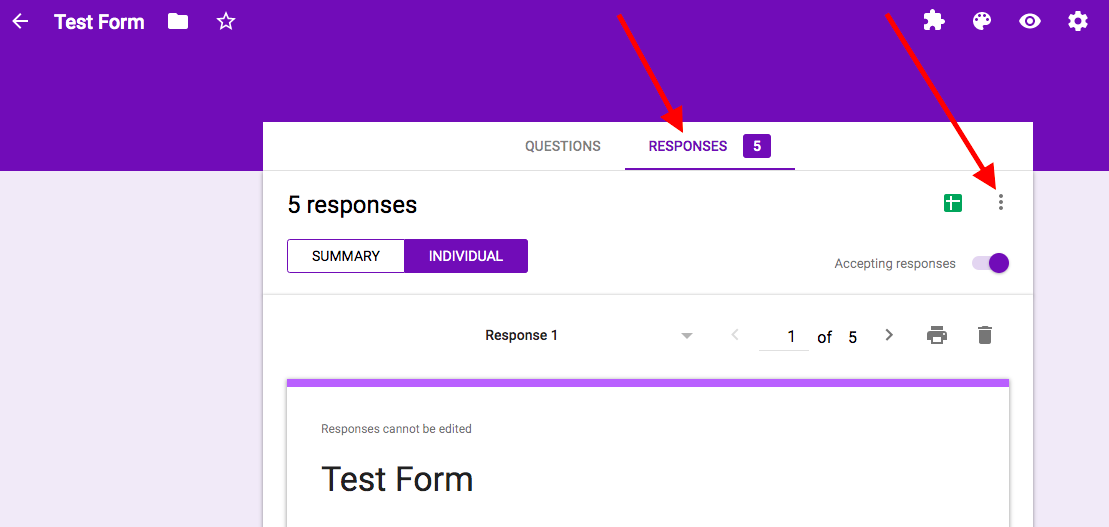
— Click on “RESPONSES” and then on the three vertical dots. —
Done. You’ll now get email anytime someone submits the form.
Release It To The World
Ready to get this thing live for your patients? Take care of these things:
- In your form, click on the settings icon (the gear symbol), and UNCHECK the box in the “Requires sign-in” section where it says “Restrict to users” in your domain.
- Make sure the boxes next to “Collect email addresses” and “Response receipts” are checked, so that you can be sure the information entered is verified by (and tied to) the user.
- Finally, copy and paste the address for your form by clicking on the preview icon and highlighting the address in the URL field at the top of your browser window.
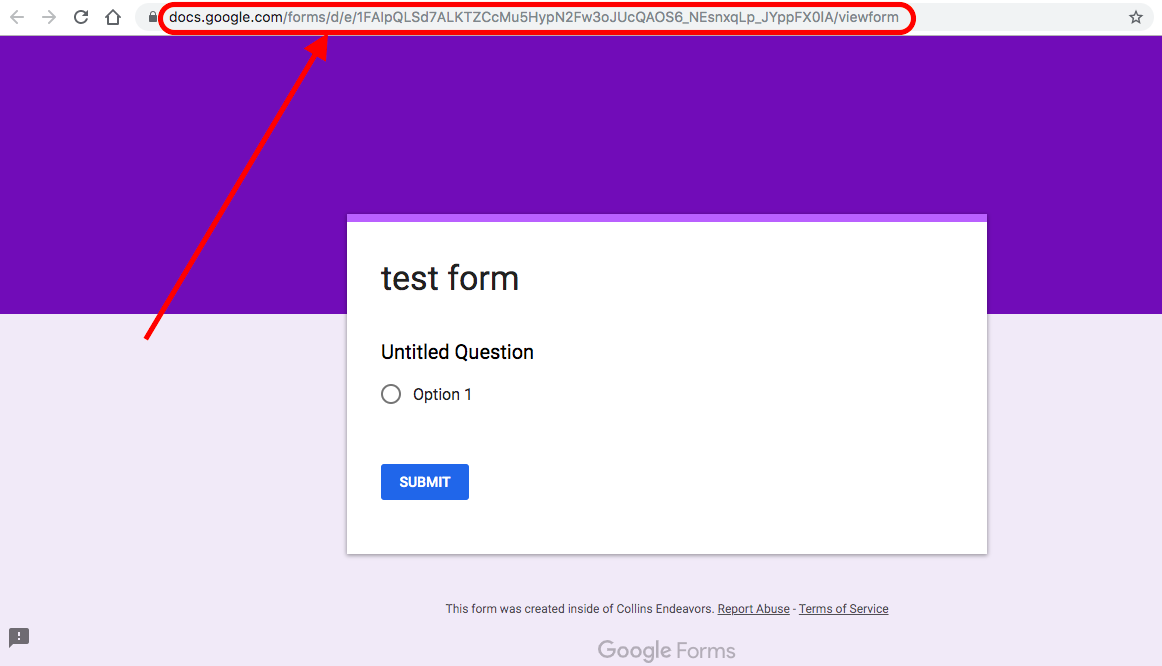
— Copy and paste your form’s public link, after clicking on the “preview” icon. —
This is the address you will send to patients who need to fill out your intake form. You can send this to them manually when they schedule an appointment, or it can be sent automatically if they sign up through an online scheduling system, for example.
Before you send it out, though, be sure and TEST the address, using the form, and receiving a copy of the data from another address and web browser NOT associated with your Google account. You want to go through the whole process as though you were an actual patient, just to make sure you work out any final kinks.
(Any easy way to do this is to simply use a different browser from the one you’re accustomed to. For example, if you usually use Chrome, fire up Safari on a Mac, or Internet Explorer on a PC. You ought to be able to make sure that the new browser is not signed in to your Google account, which should allow you to go through your form submission process as if you were an external user.)
Say Goodbye to Paper
If everything looks good, and you’ve tested your form thoroughly, you’re ready to make it live. Your intake forms will now be automatically dropped right into your G Suite account, and you’ll get notified when it happens.
You can easily pull them up just by going to drive.google.com (while logged into your G Suite account) and clicking on “Recent” in the left sidebar. It will frequently be the last document that was added to your system.
It’s also easy to pull up with a simple search for the document in the search bar.
And with that, you’ve done it. You now have an automated system where your patients can enter their information, it gets saved for you in a secure location, and you can review it quickly and easily.
Does this system require some up-front work? Sure it does.
But it’s far, far easier over the long run, knowing that you won’t have to bother handling reams of paper that will come in over the course of hundreds or thousands of patients. Filing them, scanning them, searching for them, shredding them when necessary, etc.
It’s a fantastic first step towards a practice that is more efficient, less expensive, and far less stressful.
What Now?
I want to hear from you. In the comments below, tell me about the biggest challenge you’ve had in streamlining your practice. What’s the main thing standing in your way?
How about we just do the work for you?
Don't have the time to custom build a form? I've got you covered. Let me give you access to a library of pre-built Intake Forms made for Google and G Suite. All you have to do is select the one you want, load it into your account, and get going.
There are templates pre-made for massage therapists, physical therapists, mental health professionals, and chiropractors!
We keep your account 100% private at all times.